Posted on

Scary Good Caramel Corn!

Caramel Corn

With Halloween around the corner, it’s time for one of my favorite traditions: Horror Movie Night, which is never complete without caramel corn and boozy apple cider or mulled wine.

The first time I made caramel corn, it was from a recipe we got in Home Ec, “Microwave Caramel Corn”. So this is where the tradition began. Middle school-aged children instructed how to nuke brown and white sugar, butter and corn syrup for 2 minutes, then stir in vanilla and baking soda. Put popped popcorn in a brown grocery bag and pour caramel over it, shake and nuke for another minute. Take the bag out, shake, and nuke again for 30 seconds. Voilà! Not bad for an 8th grader, but the end result was never quite crunchy enough. Very tasty, though.

We upgrading to making the caramel on the stove by high school, but still enjoyed the process of microwaving a brown paper bag filled with caramel and popcorn. It was fun to shake, after all. But really the only way to get a crispy crunchy final result is to bake the caramel corn after coating it. You have to be really careful to stir and not leave it in the oven too long, or else the sugar will burn and you will have unedible burnt caramel corn on your hands (a tragedy of epic proportions).

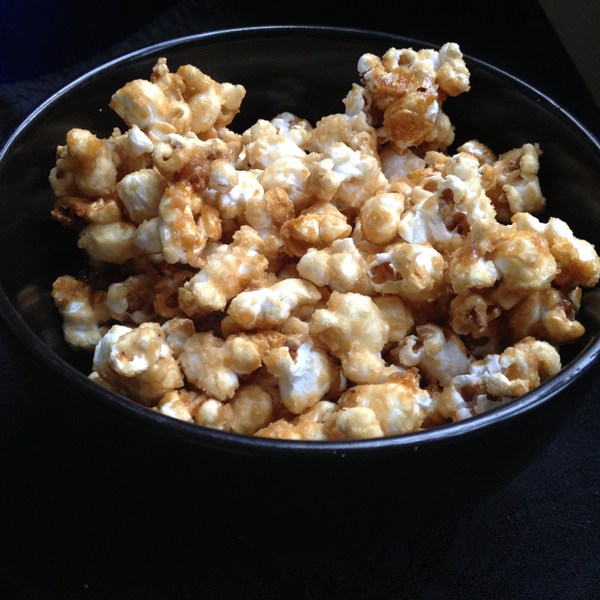
This caramel corn makes enough for two full bowls. While you probably shouldn’t eat it all yourself (it is very hard to stop once you start), it is equally hard to share one bowl between four or more people.

Making Caramel Corn


Caramel Corn

2-1/2 quarts popped popcorn (3/4 cup kernels)
3/4 cup brown sugar
3/4 cup white sugar
1/2 cup light corn syrup
1/2 teaspoon salt
1 stick butter
2 teaspoons vanilla
1/2 teaspoons baking soda
Optional: Splash of bourbon or whiskey
Optional: 1 vanilla bean

Pop the popcorn. Place a large lidded pan on a burner over medium-high heat. Add enough popcorn kernels to make one layer and enough oil to lightly coat all the kernels. Do not crowd the kernels, you may need to make two or three batches. Shake the pan lightly when the kernels begin popping, and keep over heat until the popping slows down to every couple seconds or so. Empty popcorn into a paper bag.

Preheat oven and make caramel. Set oven racks to upper and lower thirds and preheat the oven to 250° F.

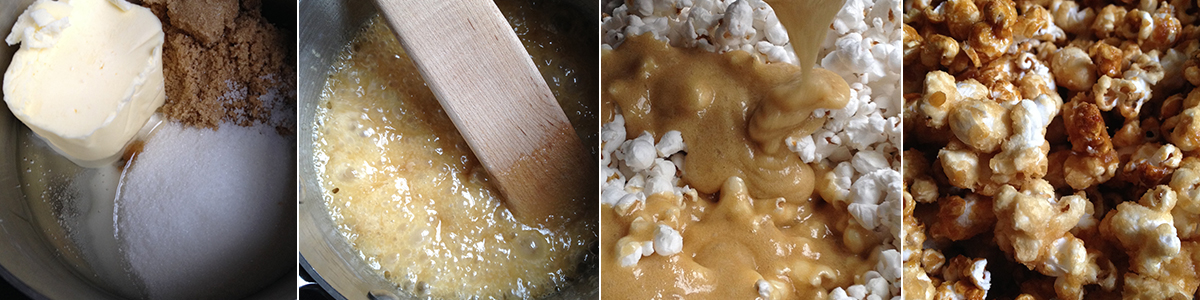
In a small saucepan, combine brown sugar, white sugar, corn syrup, salt and butter. Turn burner on to medium heat and stir, breaking up the butter. Continue stirring and cooking for about 5 minutes, scraping the sides as you go. Shortly after all the butter is melted and blended in, the caramel will start foaming and getting fluffy. This is when you want to remove the pan from heat and stir in vanilla and baking soda. (The caramel may sputter when you add the vanilla so be careful to avoid a burn.) For extra flavor depth, add a splash of bourbon or whiskey, and stir to cook off the alcohol. You can also scrape some real vanilla bean into the caramel.

Coat the popcorn with the caramel. Pour the caramel evenly over the popcorn. Close the paper bag and shake. For super even coating, microwave the bag 2 to 3 times for about 60 seconds each, shaking between so the caramel warms up and coats the popcorn evenly.

Bake. Line two rimmed baking sheets with parchment paper. Empty the mixing bowl of caramel corn equally between the two sheets in even layers. Bake for 30 to 45 minutes, stirring once, until the caramel corn is crunchy. Remove pans from oven to let cool. Break apart, transfer to bowls and enjoy!

[fblike][fbshare][twitter][twitter_follow username=”eatgoodathome”]

Posted on

Anti-Squirrel Hand Pies with Apples

Don't let the squirrels eat your apples.
Don’t let the squirrels eat your apples.

Editor’s Note: This post is not about getting rid of squirrels. If that is what you are looking for, you’re in the wrong place. Though if you find a good method, be sure to let me know.

I don’t know which story to start with first: the one about the State Fair or the one about the squirrels. Let’s start with the squirrels, because that is really where my endeavor begins.

We live in the lovely city of Minneapolis. I have lived in several other states, and have come to realize that Minnesotans live in the forest. Great emphasis is placed on keeping a diversity of tree species maintained on our boulevards and lots. Because of this, there is also an abundance of woodland creatures who have urban lifestyles. Sometimes I come home and it is like a scene from Bambi: rabbits all over the yard, squirrels scampering off, birds taking flight. Even foxes and the occasional deer. But it is the squirrels who are particularly frustrating, because their adaptation to city life is disturbing. Besides the fact that they eat our garbage and make it very difficult to compost, they also raid gardens and fruit trees.

We planted an apple tree several years back. The squirrels have always eaten the apple or two that the tree fruited. But this year was different and held much promise: there were at least three dozen apples! But as summer marched on, we noticed the numbers dwindling and half-eaten apples strewn on our yard. Last week there were ten left. Yes, it was early, but if we didn’t intervene there’d be none. So the kids and I picked the apples with plans to make apple pies with them.

Now for the State Fair part of the story. Like all good Minnesotans we spent a day at Minnesota’s Great Get Together. For the 10 days that the fair is open, all you hear about is the food. Typically, I just binge on salty and sweet foods like beer-battered deep-fried cheese curds and the real-milk milkshakes. But there are stands that sell actual food, and we wanted the kids to eat real food, so we tried some out.

While eating, what rang through my skull was the obvious challenge it must be to feed hundreds of thousands of people (quickly), and how premium ingredients are not important. Vendors produce wonderful-sounding creations, but when you take a bite there is no magic. Honestly, it’s like at weddings where they use elaborate phrases to describe green beans and an overcooked chicken breast.

So when I decided to make my apple hand-pies (which are very trendy now…though this is my first time making them), I piled on the premium ingredients: starting with the Honey-Crisp apples picked from the tree in our yard (organic, of course), Rochdale hand-rolled butter, vanilla bean and Ceylon cinnamon, with a touch of cardamom. I even used Meyer lemons for the juice. I thank goodness for The Wedge Co-op, where getting a real vanilla bean and Ceylon cinnamon from their bulk section is hardly an investment (maybe $3 for both?) and the hand-rolled butter costs the same as regular butter.

The two other fabulous components of this recipe are the crust and the quick-cooking tapioca. If you follow the instructions exactly, the crust will be beautiful and crumbly. The quick-cooking tapioca sets the filling better than any cornstarch or flour I’ve ever used.

Making Apples Hand Pies

Apples Hand Pies

Crust
2 cups flour
2 sticks butter (1 cup)
1/2 teaspoon salt
1-1/2 tablespoons ice-cold water
1-1/2 tablespoons high-proof vodka, cold
Filling
1-1/2 pounds apples, peeled and diced
1 vanilla bean, scraped and beans reserved
1/4 cup sugar
1 tablespoon quick-cooking tapioca or cornstarch
2 teaspoons Ceylon cinnamon
1/2 teaspoon cardamom
1/2 teaspoon salt
1 tablespoon lemon juice, freshly squeezed
1 egg, lightly beaten
Sugar, for sprinkling

Make the crust. Mix the flour and salt in a bowl. Cut or shave the butter into tiny pieces. Place the butter in the flour and roll the bits with your fingertips until the butter is all broken up and the mix is uniformly crumbled. Add the water and vodka and, again, mix with your fingertips until it is evenly distributed. At this point, you should be able to push the dough into a ball and it should stay packed. (If not add another tablespoon of ice-cold water, mix to distribute, and try again.) Cover tightly with plastic and pound into a disk. Let it rest for an hour on the countertop if making the pies right away, store in the refrigerator if you need it later. Let the dough come to room temperature before rolling it.

Cook the apple filling, then let cool. Place all the filling ingredients in a saucepan, including the reserved vanilla beans (but not including the egg, fyi). Cook over medium heat. Using a wooden spoon, mix with effort so that the vanilla bean and spices get distributed evenly. Cook until the apples are softened, about 15 minutes. Let cool completely before using.

Preheat oven to 400° F and roll out the dough. Roll out the dough to about 1/8-inch thickness. Cut the dough out into 4- or 5-inch disks (the size of a teacup saucer). Put a spoonful of filling on one half each disk. Make sure there is at least a half-inch margin of dough on the outside. Then fold the remaining half over the top, so you have a semi-circle. Gently press the edges of the disk together and use your fingers or a fork to smoosh the edges together. Basically, you want to seal it tight. Brush the beaten egg on top and sprinkle with sugar.

Bake. Line two baking sheets with parchment paper. Space the pies evenly apart on the baking sheets and set in the upper and lower third of the oven. Bake for 35 minutes, or until the tops are golden brown and the filling is bubbling. Place the pies on cooling racks and let rest for at least 15 minutes.

[fblike][fbshare][twitter][twitter_follow username=”eatgoodathome”]

Posted on

Cooking with (Small) Kids is Crazy

Cooking with Small Kids is Crazy
Kids in the kitchen while making a five-piece chicken dinner.
My working conditions while making a five-piece chicken dinner.

This is the truth about cooking with kids: it is a pain in the butt. Despite lofty articles about letting the kids help or making dinner in 15 minutes or less, the reality is that cooking involves sharp objects, hot things and critical timing. And nothing takes 15 minutes when young’uns are around. Kids aren’t known for their attention spans, awareness, listening, or neatness. Combine it all and it’s easy to see how the stress levels ratchet up when you are trying to get dinner on the table.

I love my kids and have loved cooking my whole life. But I do not love cooking with kids… It’s crazy!

Granted I have a lot of patience, but staying undistracted through constant interruptions, staving Pavlovian responses to the open refrigerator or pantry door, or working around projects that sprout from mimicking imaginations…the challenges surmount. And when I actually am enlisting their help, their hair is everywhere, they stick their fingers in the bowl (I think they like “helping” just so they can lick things), and they make messes. And they don’t listen. Man, how they don’t listen! I find myself repeating instructions with rapid succession and increasing volume as we nearly avoid imminent disasters.

Why do we put up with it? We press on because we know that our mothers and their mothers did*, as did generations before them. Heck, people had even more kids then.

Plus there really isn’t much choice besides figuring it out. Especially if you have to get dinner on the table solo. The urge to give in to frozen dinners comes now and then, but I believe too strongly in home-cooked dinner to cave in. Plus some days are better than others. My consolation is that I hope one day my kids will cook. I don’t shoo them from the kitchen because I like that they are creating. It is music to my ears to hear my kids ask, “How do you make that, Mommy?” or declare (as they are packing toys in the salad spinner) that they are making ice cream.

I also get satisfaction from their unbiased love of food from all walks of life, whether sweet or spicy, fresh or fried. My daughter has a new thrill, which is begging me for real ingredients. I protest, because I hate to see food wasted. But she is SO HAPPY to be playing and making Apples Sandwiches, Mushy-Mushy-Banana Pie or Squishy Grape Treats.

[divider_flat]

Learning about whole foods from an early age.

[divider_flat]
So now, after five years and three kids, I consider myself experienced enough to give advice on how to survive the early years with your kitchen skills intact.

[divider_flat]
[twocol_one]

Advice for cooking with kids:

Expect it to be hard. It just is. Unless you are making pizza, anything you make for dinner is going to require time at the stove (including boxed dinners, which we are trying to avoid anyway). It is difficult to keep hungry kids at bay while they beg for a snack. Perhaps there are toys or babies on the floor, never mind competing for utensils with tiny scientists, the list goes on.

Prep ahead. I am the last person who wants to give up my time when the kids are out of my hair, but sometimes just having the cutting board and vegetables out, I can chop a thing here and there and save myself 10 minutes during dinner crunch(crash?)-time.

Know it will take longer. Yes, you could probably work on three things at the same time when you had time to think straight. But now, in the midst of chaos, you probably can only focus on one. So don’t beat yourself up when things go off schedule. Doing as many steps as you can in advance really does help, but may mean starting a day or more ahead.

Make two. Double the recipe for more involved dishes (soup, lasagne, sauces, etc.) and freeze half, so you can have an easy dinner another night. If you can, change up the fillings (chicken vs. sausage, cheese vs. spinach) or key ingredients so you don’t have to eat the same thing twice.
[/twocol_one][twocol_one_last]

Advice for feeding kids:

Don’t give in to bland and boring. It can be irritating when the kids don’t eat something I struggled to get on the table. Though I get to be smug when they don’t eat any more of the grilled cheese I make the following night. They simply aren’t that hungry. Don’t squash the opportunity for them to love new foods by deliberately avoiding them.

Ignore picky eating. Most kids will grow up to eat like their parents, so it doesn’t make sense to cement in their brains that they “always love” one food or “won’t eat” another. If not today, maybe they will learn to like it later. I always stick everything on my kids’ plates. They don’t have to eat everything, but the option is there.

The “One-Bite” rule. Encouraging them to try new foods is necessary since kids aren’t inclined on their own. Before saying they don’t like something, my kids need to try a bite (and they aren’t allowed to throw it off their plate!). Usually, one realizes it is good and the other stands their ground. C’est la vie, we move on.

Make good food. Never underestimate a bad apple. Or tomato. Sometimes my kids take two bites of something they usually enjoy and stop there. When I taste it, I realize it is yucky. Kids don’t want to eat food that has bad texture and color any more than we do.
[/twocol_one_last]
[divider_flat]
And that’s it. Take heart and have faith. And reach out, if you need. I randomly wrote to the author of Foodlets.com when newborn + small kids + Minnesota winter + husband with late hours hit me over the head like a cast-iron pan. She gave me the encouragement I really needed that day… and some good kid-friendly recipes, to boot.
[divider_flat]

*No offense to the fathers out there. You men-who-cook-dinner are awesome, and no doubt have also suffered mental fatigue from cooking with small children.

[fblike][fbshare][twitter][twitter_follow username=”eatgoodathome”]

Posted on

Scallion Soup with Woodsy Mushrooms

[twocol_one]Scallion-Soup-with-Mushrooms_2[/twocol_one] [twocol_one_last]Scallion Soup with Mushrooms[/twocol_one_last]I think I can count myself lucky to have two friends now who go mushroom hunting. I have lifelong been a lover of mushrooms of every variety, but my this being the first time I was about to serve my family something not-purchased-at-the-grocery-store did give me pause, no doubt. I looked up the ‘shroom. It said something about chicken of the woods perhaps causing gastro issues with some people, so I did not serve it to my children, just to be sure (I experienced nothing of the sort…only very happy tastebuds and a happy tummy).

That said, the Chicken of the Woods mushroom is an exotic variety of mushroom. 100% edible. It bears no resemblance to chicken itself, other than its taste. It has lobster-like coloring and emerges from rotting trees like Chihuly art. But it gets its name from the chicken-like or meaty flavor it imparts after cooking it.

I have learned that you should treat “alternative” ingredients just as you would primary. A mushroom is a mushroom, whether it be button, chanterelle, or chicken of the woods. An onion is an onion, whether it be leek, ramp, or scallion. Treating the ingredient simply allows you to appreciate its unique flavor. This soup was perfect. Combining mushrooms and onions is about as old as the Black Forest itself. Stock, wine, cream, butter and salt serve as the happy entourage.

Scallion Soup with Chicken of the Woods and Hot Chili Oil

Soup
3 tablespoons bacon drippings (or oil)
4 bunches of scallions (about 3/4 pounds), trimmed and rough chopped
3 cloves garlic or 1 teaspoon garlic powder
2 cups chicken broth
1/4 cup white wine
1-1/2 teaspoons salt
Freshly ground black pepper
1/2 cup cream
Hot chili oil for drizzling
Mushrooms
2 cups chicken of the woods mushrooms
3 tablespoons butter
2 tablespoons parsley, chopped
Water
Salt

Cook the soup. Heat the bacon grease in a soup pot over medium-high heat. Add the scallions and garlic, sweat for 5 minutes or so. The scallions should still be bright green, but tender. Add the broth, wine, salt, and pepper. Simmer for about 10 minutes, then purée. Mix in cream and stir, set aside.

Cook the mushrooms. Melt the butter in a small pan over medium heat. You are going to use the edging of the mushrooms, so trim the ruffles off about 1–2 inches in from the outside. Slice into 1/4-inch matchsticks and add to butter. Sauté about 5 minutes. Add some water to pan, if butter is absorbed and mushrooms aren’t done. Stir in salt and parsley when close to finished cooking.

Serve. Ladle the soup into bowls. Add several scoops of mushrooms to each bowl. Top with some parsley and drizzle with oil. Serve.

Posted on

Lemongrass-Infused Ice Cream with Coconut Milk

Lemongrass Infused Ice Cream with Coconut Milk

Summertime is ice cream season at our house. I suppose it started with a need to make myself use small appliances purchased impulsively years ago. Appliances such as the ice cream maker. Homemade ice cream is really easy, though the hard part is making sure you set the maker-bowl in the freezer at least 24 hours in advance. I just keep mine in the freezer all summer. You also need to let the custard cool down completely before putting it in the ice cream maker. Ergo, you need to work on it the day before you want it. If you don’t do either of those two steps, you will simply have ice cream soup.

Next is your ice cream base, it goes something like:

1 cup heavy whipping cream
2 cups whole milk
3 egg yolks
2/3 cups of sugar
1 vanilla bean, split, beans scraped out, bean reserved

This produces about a quart of ice cream.

There are many variations on that theme (milk vs. half-n-half, amount of sugar, number of egg yolks). This is the one I’ve memorized and stick to. Besides fresh eggs and cream, the most important ingredient is the vanilla bean. They are pricey, but if you can get them in the bulk section of Whole Foods or The Wedge, they aren’t much more than $2. I have learned that ice cream is one of those things that isn’t necessarily cheaper to make at home. Though for the quality and quantity you get, it’s more of just a fun way to be creative in the kitchen.

After this, at our house, we start jiving on flavors. Flavors that will complement a cake or pie, flavors that take advantage of a seasonally abundant ingredient, flavors that simply sound like they’ll be good. Today, I wanted to use up some scraps in the fridge. I had leftover lemongrass stalks from a peanut sauce, and a half can of coconut milk from Jamaican rice and peas, and lemongrass coconut ice cream sounded good! So away we went!

Here is what you need for lemongrass coconut ice cream:

6 stalks of lemongrass, rigid leaves removed, tender parts chopped
1 cup regular coconut milk (not light!)

Dissolve the sugar in the milk and cream, add lemongrass and vanilla bean. Place the heavy cream, milk and sugar in a heavy-bottomed saucepan and begin cooking over medium to medium-low heat. Add the chopped lemongrass. Scrape out the seeds of the vanilla bean and add the seeds and the bean to the custard. Stir until sugar is dissolved.

Temper eggs. If you added the eggs to the warmed liquid in the saucepan, it would make scrambled eggs. We want to warm them up before adding them in so they stay silky. Lightly whisk the eggs in a small bowl. Use a tablespoon or quarter-cup to add the warmed cream and sugar to the egg bowl and whisk to blend. Do this a couple times, then add the egg mixture into the saucepan and mix.

Cook until the custard thickens. Cook on medium to medium-low, stirring constantly. Do not let the mixture boil. Cook until it coats the back of a spoon, 7-10 minutes.

Add coconut milk, and chill for several hours, preferably overnight. Place the custard in a bowl. Pour in the cup of coconut milk and stir just until blended. Get a piece of cling wrap and seal so the cling wrap touches the top surface of the custard, and comes up the inside of the bowl. If you don’t do this, a skin will form on the custard. Place in the refrigerator overnight to allow the temperature to come down, and all the flavors to develop.

Make ice cream (best part!). Oh, and don’t forget to strain. Set your frozen ice cream bowl into your stand mixer or appliance, place all the gizmos in place and turn on. I inverted a mesh strainer on the inside of the bowl as I poured the custard into the mixer. When I got toward the end, I used a slotted spoon to scoop out the lemongrass bits and vanilla bean, then dumped the last couple tablespoons in the mixer (because that last part had tons of vanilla bean seeds I didn’t want clinging to the bowl). You can also strain the custard into another bowl, then dump the whole thing in the mixer. Mix for 15-20 minutes, or until you see you have nice thick, fluffy ice cream churning in the bowl.

I had actually made a lime curd I was going to swirl in at the end (again, trying to use up aging ingredients from the fridge), but it was so tangy I thought I’d save the lime curd for something else. This ice cream has a delicate flavor and would be served best by itself.

Posted on

Radish Hamburger Buns

Radish Hamburger Buns
Unpeeled radishes yield a bun with pink flecks in it like this one.

Typically I shy away from baking endeavors in the summer because it is too hot. But this year, it is what I would call a perfect summer. 70’s to 80’s, low humidity. The other week I made foccacia and was pleased to discover that my dough actually rose in the amount of time it was supposed to. Usually (making breads in the winter) I have to double the time for the dough to double.

My plan for dinner was to grill some beef tenderloin. Since the weather is so nice, I wanted to make homemade hamburger buns to go with it. I spied some radishes in the fridge from Fava Bean and Radish Bruschetta that I made the other week. (A winner recipe, by the way.)

I hate to admit this, but I am no lover of radishes. In fact, when I signed up for a CSA and got them in my box week after week, I puzzled over who the heck would ever want this volume of radishes. Since then, I am trying to find ways to love the radish, since it is grows in abundance locally. So I stare at the radishes, with beef sandwiches on my mind, and decided what the heck. Maybe they’ll enhance the bun like a horseradish would. I’ll throw them into the dough, see what happens.

Oh mama! Bingo! This is a marvelous sandwich! Squishy (soft, like store-bought) but with enough tang to complement the beef. It’s much more subtle than onion, and doesn’t affect the texture at all.

I did experiment with peeled versus unpeeled radishes. Upon grating my first radish I realized that unpeeled would make the dough have pink flecks in it. I guess that just announces you’ve added something unusual. I prefer going incognito and peeling the radishes first, then grating them.

Experimenting with peeled vs unpeeled grated radish.

By the way, this is a good recipe for regular hamburger buns if you want to minus the radishes. Just adjust for the moisture (i.e., add more water, like a half cup).

Making Radish Hamburger Buns

Radish Hamburger Buns

3 cups flour, plus more
1 cup warm water
1 tablespoon instant or dry yeast
2 tablespoons sugar
2 tablespoons butter, melted
1 egg
1-1/2 teaspoons salt
A bunch of radishes (8 to 12)

Activate the yeast. Whisk together the yeast and sugar with warm water. Let it sit until a froth develops on the top (if froth doesn’t develop, your yeast may be too old…better go to the store to get new stuff rather than have dense buns).

Grate the radishes. If you don’t want pink flecks in your buns, peel the radishes. Then, grate them as finely as you can. I used a microplane zester. Keep in mind, here, that radishes vary in size. You may want to start with most of the radishes, leaving some aside. After mixing in the flour, taste the dough after and decide if you want it to radish it up some more. (I started with 8 small-size radishes and definitely wanted more flavor.)

Mix the dough together. If you are using a mixer, you are going to need a heavy-duty stand mixer with the dough hook. I usually start with the paddle, then switch to the dough hook after everything is mixed. Stir together the butter, egg and salt with the yeast and sugar water. Add the grated radishes. On low speed, incorporate the flour a cup at a time. Switch to the dough hook.

Adjust the flour. What you want to do now is get the moisture of the dough right. If it’s too dry, you’ll have dry bread, so we start with excessive water. Just a note, the tackiness of the dough will diminish after it’s mixed for 10 minutes, so don’t overdo the flour. Let it be a little too wet. Start the mixer on medium speed. See the dough sticking to the bottom of the bowl? That’s good. Get a scoop of flour and shake a tablespoon at a time into the mixer. Let it blend in, continue adding a little at a time. You want to adjust the flour so you have about a 4-inch diameter (about a teacup saucer-size) of dough sticking to the bottom while it mixes.

Develop the gluten. Beat the dough for 7-10 minutes. Longer is better. When the dough is done, it should be loose. I like hearing the dough slapping around. Hopefully, there is still some sticking to the bottom of the bowl. If not, you may want to add a little more water and mix it until it is completely incorporated.

Let the dough have a first rise. Form the dough into a ball and place it in a well-oiled bowl. Cover the bowl tightly with plastic and let the dough double. Depending on how much time you have, you can let it rise on the counter or in the fridge. About an hour for room temperature, enough time to go to two stores and get lunch for the fridge.

Deflate, shape and let it rise again. Punch the dough down and separate it into 10 equal(ish) pieces (use a scale if you are a perfectionist). Roll each piece into a ball, getting it as smooth as possible. Lay down a piece of parchment paper on a baking sheet, and place each ball on the sheet with equal spacing. Personally, I like when they smoosh together a little after baking. But, again, if you are a perfectionist and want perfectly separated buns you may want to use two lined baking sheets. Dust the tops lightly with flour and cover loosely with plastic wrap or a tea towel, let rise for an hour.

Rise, butter, bake. When the buns have puffed up some but not quite doubled, preheat the oven to 375°. Melt a couple tablespoons of butter and brush the tops of the dough balls with it. Bake the buns for 12-15 minutes, or until the tops are browned. Cool them on a wire rack completely before cutting in half.


Posted on

The Best Way To Clean a Burned Pan

One time, when I was a teenager, I set off the house fire alarms from forgetting that I was boiling noodles on the stove. Yep, you heard that right. I completely forgot about it, so all the water boiled away and the noodles started smokin’. I’m better that that now…I never burn anything with a lot of liquid in the pan. But any dish that has me cook something thick—unsupervised—for longer than a half hour is likely to end up as a burned pan. I’m sorry, I am an active cook. I can fly around the kitchen like no one’s business. But if you say I can leave it for an hour, I probably will. Only when my nose catches a whiff of that burned smell do I realize that my “low” wasn’t low enough, and I’m too late to save the dish. (Hence, why I use a slow cooker.) The worst is when it is something precious, like Momofuku’s taré recipe involving roasted chicken bones, mirin and soy sauce. The kitchen goes from smelling glorious to singed in less than fifteen minutes. Precious ingredients wasted. Precious time wasted.

The fact that my expensive Le Creuset Dutch oven was at stake (a wedding present from my sister, no less), prompted me to do an online investigation. This is the very best way to remove burned food from an enameled pan or treated non-stick pan without scratching it.

This hydrogen-peroxide and baking soda solution was posted online and voted highly, so I gave it a try:

[quote]Add about a 1/2-inch of Hydrogen Peroxide, and 1-2 teaspoons of baking soda to the pot. Heat until it starts to bubble up. It needs the heat to start the reaction. Simmer about 10 mins … and brush with a green scrub brush and use a wooden spoon to scrape. Repeat as needed. It gets into the bond of the carbon and lifts it of the pan. It will bubble and stink, so turn on your vent. But it won’t harm the enamel. I’ve tried all the above for high sugar crusts/carbon burned on stuff. This is the ONLY thing that works 100 percent of the time without scratching your pan.[/quote]

Honestly, it is magic. A bit stinky, but within 15 minutes the solution was clear and the pan was clean.

Another time, after searing some marinated flank steak in my cast iron, I needed a trick for a seasoned pan. For cast-iron pans, method #1 is to add enough water to cover the bottom of the skillet, then put it right back on the stovetop and heat it until the water begins to boil. When the water cools, use a scrubber or wooden spatula to remove all of the crud. If the crud is impossibly stubborn, method #2 is to put the pan in the oven and turn the oven to the self-clean cycle (which does kill two birds with one stone). You will have to reseason the pan after the high-temperature method.

Posted on

Key Lime Pie

Key Lime Pie

In my mind, The Birchwood Café’s key lime pie is the gold standard. The lime doesn’t cower away, it stands out boldly between the other two major forces at work: sweet and creamy. As your fork cruises through the chilled custard it stops, then goes “thunk” through the graham cracker crust.

So when I spied a bag of key limes (which aren’t always readily available, just so you know) I did my best to replicate perfection. I think I came close, although the topping is just whipped heavy cream. I suspect Birchwood adds some butter to theirs.

To make this with key limes, you will need an entire 1 pound bag of key limes (about 20 limes). If you can’t get your hands on key limes, you’ll need about 3 regular. This recipe is best if made a day ahead of time (though we aren’t judging you if it ain’t!)

Key Lime Pie Ingredients

Key Lime Pie

Graham Cracker Crust
1-1/4 cups graham cracker crumbs
2 tablespoons granulated white sugar
6 tablespoons good butter, melted
Filling
3 large egg yolks, room temperature
One 14 – ounce can sweetened condensed milk
1/2 cup key lime juice
2 teaspoons grated lime zest
Topping
1 cup cold heavy whipping cream
4 tablespoons sugar

Make the crust. Preheat the oven to 350° F and place the oven rack in the center of the oven. Butter a 9-inch pie or tart pan. Mix together the graham cracker crumbs, sugar, and melted butter. Turn into the prepared pie pan; press the crust down in the middle and work your way up the sides, going all the way around the pie dish. Bake for about 7 minutes or until set. Remove from oven and place on wire rack to cool. If the crust shrunk, gently press it back into place using a wooden spoon.

Make the filling. In the bowl of your electric mixer, with the whisk attachment, beat the egg yolks until pale and fluffy, about 2-3 minutes. Gradually add the condensed milk and beat until light and fluffy, about 3-5 minutes. Scrape down the sides of the bowl and then beat in the lime juice and zest.

Bake the pie until the filling is just set. Pour the filling over the crust and bake for about 10 – 15 minutes, or until the filling is set. Do not overbake! Shake the pan gently. If it barely or doesn’t jiggle, it is done. Remove from oven and place on a wire rack to cool. Once it has completely cooled, cover and refrigerate for several hours or overnight.

Make the whipped cream. Once the filling has chilled, in the bowl of your electric mixer, with the whisk attachment (or with a hand mixer), beat the whipping cream and sugar until stiff peaks form. Either pipe (if you wanna be fancy) or place mounds of whipping cream on top of the filling. Can be stored in the refrigerator for a few days.

Makes one 9-inch pie or tart.

Posted on

Better-Than-Steak-Sauce Mushrooms

I stumbled across a beautiful bag of shiitakes for $5 on the University of Minnesota St. Paul campus, sold by a student from the mycological department. Since we were going to be grilling some steaks over the weekend, I thought it might serve us well to grab a bag. (They also sold some gorgeous red wine cap mushrooms, among other varieties.)

These marinated, grilled mushrooms were simple to prepare, and better than any steak sauce. Just pile them on top of your grilled goodies before taking a bite.

Grilled Shiitakes

Grilled Red Wine-Balsamic Mushrooms

8 ounces shiitake mushrooms (or any with a wide cap like portobella or red wine cap)
2 tablespoons red wine vinegar
2 tablespoons olive oil
Salt & black pepper
1/2 – 1 cup balsamic vinegar

Marinate the mushrooms. Wash and pat dry the mushrooms. Trim off stems and set in a bowl. Splash in a couple tablespoons of red wine vinegar, a couple tablespoons of oil, and several shakes of salt and black pepper. Marinate until you are ready to use them (I marinated mine for a couple hours).

Make balsamic reduction. Set between a half to a whole cup of balsamic vinegar in a quart-sized saucepan. Simmer vigorously until the liquid is two-thirds reduced, or coats the back of a spoon. Set aside to cool.

Skewer the smaller mushrooms. Using kabob sticks, skewer smaller mushrooms through the middle so they are spaced evenly, every inch or half-inch or so. Set big mushrooms aside.

Grill the mushrooms. Over a medium-high flame, lay flat any large mushrooms that aren’t at risk for falling through the grill, and set in place the mushroom skewers. Cook for about 10 minutes, turning them over every so often. Mushrooms are done when they are tender and juicy.

Serve. Set them on a platter and drizzle balsamic reduction on top. The balsamic reduction adds a nice note of sweetness to the complement the vinegar. Top burgers, steaks or eat them as is.

[fblike][fbshare][twitter][twitter_follow username=”eatgoodathome”]

Posted on

Macrobiotic Baby Food

Baby Food - Apricots
Apricots, puréed with microplane zester

I’ve been mulling on baby food. At seven months old, Ike has broken out of the rice cereal box. While I love introducing him to table food, I also think there has to be something between unseasoned purées and fully seasoned table food. Something besides Cheerios, that is.

I am sorry, but I guess I sympathize with the babies when they recoil at the taste of plain spinach and peas. Cooked. And puréed. It’s a nice idea, but I can’t help but think, “Yeah buddy, we usually like ours with salt and butter.” I wouldn’t eat it. (I am not even going to bring up puréed meats! Ack!)

Raw (not steamed) vegetables and fruits seem like they should be a typical baby food. Not only do raw foods contain lovely macrobiotic properties, but they taste less bitter than cooked vegetables. The stumbling block is getting the food broken down for baby so they don’t have to “chew” on it. The other week I tried whipping carrots and broccoli through the food processor, but they didn’t get small enough for Ike. He hacked a couple times. Not good.

In the meantime, I found mixing rice cereal with “reserved liquids” worked quite well. Ike pretty much gobbled up everything so far: the tomato-onion water from pico de gallo salsa, the simmering water from aromatic black beans, broth from vegetable soup. These are all a hit with Ike, but still do not reveal the deliciousness of good, clean vegetables. So this raw thing continued to plague me. I mean, I’m cooking and munching on prep scraps, thinking there has to be a way for Ike to enjoy this as well.

I had some ideas tonight… I tried the garlic press… I tried the parmesan grater… Then I tried the microplane zester and SUCCESS! I turned relatively firm fruit into a beautiful purée for Ike. He loved it. Then he got full and cranky and wanted to go to bed. But I kept on… I tried apples, carrots and grapes. And I think the zester is IT.

With fruit, you can just halve the item and grate against the zester down to the skin. For vegetables, you have to be a little more careful with your fingers. Just grate until concern for the well-being of your knuckles outweighs the amount of food left in your fingertips.

Is it weird to say that I am thrilled to introduce “the salad” to my son? I mean, I just love the idea that I can show my infant child the beauty of fresh fruit and vegetables. Call me a nerd. A garden nerd, that is.