Posted on

Triple Vanilla Sugar Cookies

‘Tis the holiday season and everyone who plans on making Christmas cookies (including me) is searching for cookie recipes that will impress. Sometimes it’s about putting a twist on a good thing, and sometimes it’s just about making a good thing better. You know, like amping up the special.

This recipe is not necessarily a twist on a classic. Rather a long pause — like making the dough on Wednesday and baking the cookies on Saturday. Or just a technical improvement — like rolling out the dough just after mixing, and letting it refrigerate in a thin sheet, which makes it easier to cut and helps keeps their shape.  What you will get is vanilla-packed flavor with easy cookie-cutter precision.

The trick to these rolled sugar cookies is to barely mix the dough to prevent spreading (no fluffing the butter and sugar!). Also, you will make your own vanilla sugar for coating the cookies and refrigerate the dough for a couple days so the vanilla bean aroma can thoroughly infuse the dough.


Triple Vanilla Sugar Cookies

1 cup sugar
1 cup butter (2 sticks), softened
1 teaspoon baking soda
2 eggs
2 vanilla beans
1 tablespoon vanilla extract
1 teaspoon almond extract
3 cups flour
1 additional cup sugar*
1 container with air-tight lid

[divider]

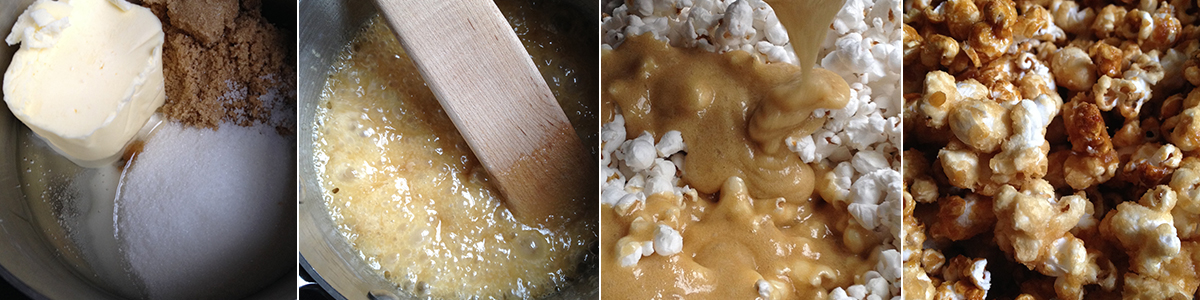
Blend butter and sugar until just mixed. On medium-low speed, mix butter and sugar until just combined, about 30 seconds.

Mix remaining ingredients. Carefully slit the vanilla beans and scrape the seeds into the mixing bowl, reserving the pods. Add the baking soda, eggs, vanilla extract and almond extract. Mix until just blended, about 3 minutes. Then, 1 cup at a time, add the flour until completely mixed.

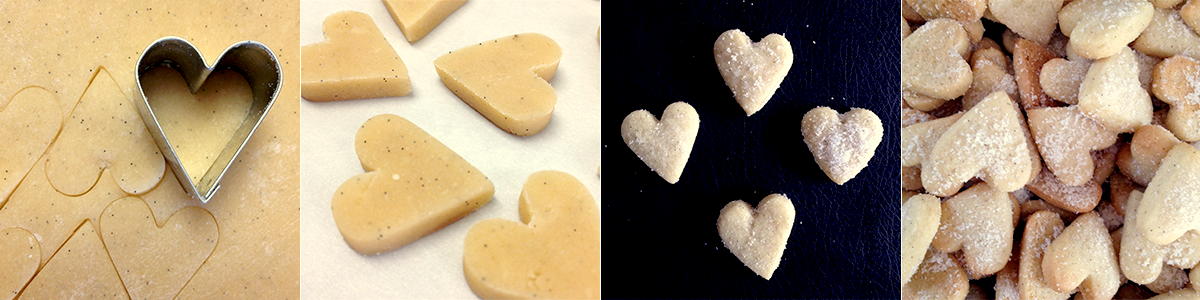
Roll out dough and refrigerate up to 4 days. Line a baking sheet with parchment paper. Gather the dough into a ball and set onto a lightly floured surface. Using a floured rolling pin, roll out the dough 1/8- to 1/4-inch thick. Transfer dough to baking sheet, cover in plastic and store in refrigerator.

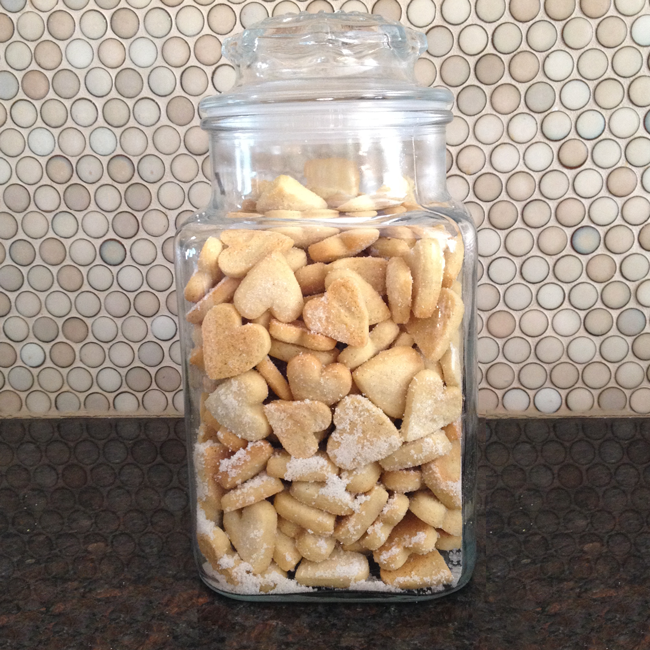
Make vanilla sugar. Pour about a cup of sugar into a jar or container. Add reserved vanilla beans. Seal and store until ready to use. (Shake periodically.)
*You can make colored sugar by adding a couple drops of food coloring. Or if you plan on frosting the cookies, use powdered sugar.

Preheat oven to 350° F then bake. Line another baking sheet with parchment paper. Use the cutter of your choice to make shapes. Transfer cookies to baking sheet and sprinkle with vanilla sugar. Bake for 10–12 minutes, until edges are light brown.

P.S. Make sure there isn’t anything strong-smelling in the fridge, like bowls of chopped onions.

Makes about 3 dozen standard-size cookies, or 8 dozen mini cookies.
[divider]

[fblike][fbshare][twitter source=”EatGoodAtHome”][twitter_follow username=”EatGoodAtHome”]

Posted on

Scary Good Caramel Corn!

Caramel Corn

With Halloween around the corner, it’s time for one of my favorite traditions: Horror Movie Night, which is never complete without caramel corn and boozy apple cider or mulled wine.

The first time I made caramel corn, it was from a recipe we got in Home Ec, “Microwave Caramel Corn”. So this is where the tradition began. Middle school-aged children instructed how to nuke brown and white sugar, butter and corn syrup for 2 minutes, then stir in vanilla and baking soda. Put popped popcorn in a brown grocery bag and pour caramel over it, shake and nuke for another minute. Take the bag out, shake, and nuke again for 30 seconds. Voilà! Not bad for an 8th grader, but the end result was never quite crunchy enough. Very tasty, though.

We upgrading to making the caramel on the stove by high school, but still enjoyed the process of microwaving a brown paper bag filled with caramel and popcorn. It was fun to shake, after all. But really the only way to get a crispy crunchy final result is to bake the caramel corn after coating it. You have to be really careful to stir and not leave it in the oven too long, or else the sugar will burn and you will have unedible burnt caramel corn on your hands (a tragedy of epic proportions).

This caramel corn makes enough for two full bowls. While you probably shouldn’t eat it all yourself (it is very hard to stop once you start), it is equally hard to share one bowl between four or more people.

Making Caramel Corn


Caramel Corn

2-1/2 quarts popped popcorn (3/4 cup kernels)
3/4 cup brown sugar
3/4 cup white sugar
1/2 cup light corn syrup
1/2 teaspoon salt
1 stick butter
2 teaspoons vanilla
1/2 teaspoons baking soda
Optional: Splash of bourbon or whiskey
Optional: 1 vanilla bean

Pop the popcorn. Place a large lidded pan on a burner over medium-high heat. Add enough popcorn kernels to make one layer and enough oil to lightly coat all the kernels. Do not crowd the kernels, you may need to make two or three batches. Shake the pan lightly when the kernels begin popping, and keep over heat until the popping slows down to every couple seconds or so. Empty popcorn into a paper bag.

Preheat oven and make caramel. Set oven racks to upper and lower thirds and preheat the oven to 250° F.

In a small saucepan, combine brown sugar, white sugar, corn syrup, salt and butter. Turn burner on to medium heat and stir, breaking up the butter. Continue stirring and cooking for about 5 minutes, scraping the sides as you go. Shortly after all the butter is melted and blended in, the caramel will start foaming and getting fluffy. This is when you want to remove the pan from heat and stir in vanilla and baking soda. (The caramel may sputter when you add the vanilla so be careful to avoid a burn.) For extra flavor depth, add a splash of bourbon or whiskey, and stir to cook off the alcohol. You can also scrape some real vanilla bean into the caramel.

Coat the popcorn with the caramel. Pour the caramel evenly over the popcorn. Close the paper bag and shake. For super even coating, microwave the bag 2 to 3 times for about 60 seconds each, shaking between so the caramel warms up and coats the popcorn evenly.

Bake. Line two rimmed baking sheets with parchment paper. Empty the mixing bowl of caramel corn equally between the two sheets in even layers. Bake for 30 to 45 minutes, stirring once, until the caramel corn is crunchy. Remove pans from oven to let cool. Break apart, transfer to bowls and enjoy!

[fblike][fbshare][twitter][twitter_follow username=”eatgoodathome”]

Posted on

Anti-Squirrel Hand Pies with Apples

Don't let the squirrels eat your apples.
Don’t let the squirrels eat your apples.

Editor’s Note: This post is not about getting rid of squirrels. If that is what you are looking for, you’re in the wrong place. Though if you find a good method, be sure to let me know.

I don’t know which story to start with first: the one about the State Fair or the one about the squirrels. Let’s start with the squirrels, because that is really where my endeavor begins.

We live in the lovely city of Minneapolis. I have lived in several other states, and have come to realize that Minnesotans live in the forest. Great emphasis is placed on keeping a diversity of tree species maintained on our boulevards and lots. Because of this, there is also an abundance of woodland creatures who have urban lifestyles. Sometimes I come home and it is like a scene from Bambi: rabbits all over the yard, squirrels scampering off, birds taking flight. Even foxes and the occasional deer. But it is the squirrels who are particularly frustrating, because their adaptation to city life is disturbing. Besides the fact that they eat our garbage and make it very difficult to compost, they also raid gardens and fruit trees.

We planted an apple tree several years back. The squirrels have always eaten the apple or two that the tree fruited. But this year was different and held much promise: there were at least three dozen apples! But as summer marched on, we noticed the numbers dwindling and half-eaten apples strewn on our yard. Last week there were ten left. Yes, it was early, but if we didn’t intervene there’d be none. So the kids and I picked the apples with plans to make apple pies with them.

Now for the State Fair part of the story. Like all good Minnesotans we spent a day at Minnesota’s Great Get Together. For the 10 days that the fair is open, all you hear about is the food. Typically, I just binge on salty and sweet foods like beer-battered deep-fried cheese curds and the real-milk milkshakes. But there are stands that sell actual food, and we wanted the kids to eat real food, so we tried some out.

While eating, what rang through my skull was the obvious challenge it must be to feed hundreds of thousands of people (quickly), and how premium ingredients are not important. Vendors produce wonderful-sounding creations, but when you take a bite there is no magic. Honestly, it’s like at weddings where they use elaborate phrases to describe green beans and an overcooked chicken breast.

So when I decided to make my apple hand-pies (which are very trendy now…though this is my first time making them), I piled on the premium ingredients: starting with the Honey-Crisp apples picked from the tree in our yard (organic, of course), Rochdale hand-rolled butter, vanilla bean and Ceylon cinnamon, with a touch of cardamom. I even used Meyer lemons for the juice. I thank goodness for The Wedge Co-op, where getting a real vanilla bean and Ceylon cinnamon from their bulk section is hardly an investment (maybe $3 for both?) and the hand-rolled butter costs the same as regular butter.

The two other fabulous components of this recipe are the crust and the quick-cooking tapioca. If you follow the instructions exactly, the crust will be beautiful and crumbly. The quick-cooking tapioca sets the filling better than any cornstarch or flour I’ve ever used.

Making Apples Hand Pies

Apples Hand Pies

Crust
2 cups flour
2 sticks butter (1 cup)
1/2 teaspoon salt
1-1/2 tablespoons ice-cold water
1-1/2 tablespoons high-proof vodka, cold
Filling
1-1/2 pounds apples, peeled and diced
1 vanilla bean, scraped and beans reserved
1/4 cup sugar
1 tablespoon quick-cooking tapioca or cornstarch
2 teaspoons Ceylon cinnamon
1/2 teaspoon cardamom
1/2 teaspoon salt
1 tablespoon lemon juice, freshly squeezed
1 egg, lightly beaten
Sugar, for sprinkling

Make the crust. Mix the flour and salt in a bowl. Cut or shave the butter into tiny pieces. Place the butter in the flour and roll the bits with your fingertips until the butter is all broken up and the mix is uniformly crumbled. Add the water and vodka and, again, mix with your fingertips until it is evenly distributed. At this point, you should be able to push the dough into a ball and it should stay packed. (If not add another tablespoon of ice-cold water, mix to distribute, and try again.) Cover tightly with plastic and pound into a disk. Let it rest for an hour on the countertop if making the pies right away, store in the refrigerator if you need it later. Let the dough come to room temperature before rolling it.

Cook the apple filling, then let cool. Place all the filling ingredients in a saucepan, including the reserved vanilla beans (but not including the egg, fyi). Cook over medium heat. Using a wooden spoon, mix with effort so that the vanilla bean and spices get distributed evenly. Cook until the apples are softened, about 15 minutes. Let cool completely before using.

Preheat oven to 400° F and roll out the dough. Roll out the dough to about 1/8-inch thickness. Cut the dough out into 4- or 5-inch disks (the size of a teacup saucer). Put a spoonful of filling on one half each disk. Make sure there is at least a half-inch margin of dough on the outside. Then fold the remaining half over the top, so you have a semi-circle. Gently press the edges of the disk together and use your fingers or a fork to smoosh the edges together. Basically, you want to seal it tight. Brush the beaten egg on top and sprinkle with sugar.

Bake. Line two baking sheets with parchment paper. Space the pies evenly apart on the baking sheets and set in the upper and lower third of the oven. Bake for 35 minutes, or until the tops are golden brown and the filling is bubbling. Place the pies on cooling racks and let rest for at least 15 minutes.

[fblike][fbshare][twitter][twitter_follow username=”eatgoodathome”]

Posted on

Lemongrass-Infused Ice Cream with Coconut Milk

Lemongrass Infused Ice Cream with Coconut Milk

Summertime is ice cream season at our house. I suppose it started with a need to make myself use small appliances purchased impulsively years ago. Appliances such as the ice cream maker. Homemade ice cream is really easy, though the hard part is making sure you set the maker-bowl in the freezer at least 24 hours in advance. I just keep mine in the freezer all summer. You also need to let the custard cool down completely before putting it in the ice cream maker. Ergo, you need to work on it the day before you want it. If you don’t do either of those two steps, you will simply have ice cream soup.

Next is your ice cream base, it goes something like:

1 cup heavy whipping cream
2 cups whole milk
3 egg yolks
2/3 cups of sugar
1 vanilla bean, split, beans scraped out, bean reserved

This produces about a quart of ice cream.

There are many variations on that theme (milk vs. half-n-half, amount of sugar, number of egg yolks). This is the one I’ve memorized and stick to. Besides fresh eggs and cream, the most important ingredient is the vanilla bean. They are pricey, but if you can get them in the bulk section of Whole Foods or The Wedge, they aren’t much more than $2. I have learned that ice cream is one of those things that isn’t necessarily cheaper to make at home. Though for the quality and quantity you get, it’s more of just a fun way to be creative in the kitchen.

After this, at our house, we start jiving on flavors. Flavors that will complement a cake or pie, flavors that take advantage of a seasonally abundant ingredient, flavors that simply sound like they’ll be good. Today, I wanted to use up some scraps in the fridge. I had leftover lemongrass stalks from a peanut sauce, and a half can of coconut milk from Jamaican rice and peas, and lemongrass coconut ice cream sounded good! So away we went!

Here is what you need for lemongrass coconut ice cream:

6 stalks of lemongrass, rigid leaves removed, tender parts chopped
1 cup regular coconut milk (not light!)

Dissolve the sugar in the milk and cream, add lemongrass and vanilla bean. Place the heavy cream, milk and sugar in a heavy-bottomed saucepan and begin cooking over medium to medium-low heat. Add the chopped lemongrass. Scrape out the seeds of the vanilla bean and add the seeds and the bean to the custard. Stir until sugar is dissolved.

Temper eggs. If you added the eggs to the warmed liquid in the saucepan, it would make scrambled eggs. We want to warm them up before adding them in so they stay silky. Lightly whisk the eggs in a small bowl. Use a tablespoon or quarter-cup to add the warmed cream and sugar to the egg bowl and whisk to blend. Do this a couple times, then add the egg mixture into the saucepan and mix.

Cook until the custard thickens. Cook on medium to medium-low, stirring constantly. Do not let the mixture boil. Cook until it coats the back of a spoon, 7-10 minutes.

Add coconut milk, and chill for several hours, preferably overnight. Place the custard in a bowl. Pour in the cup of coconut milk and stir just until blended. Get a piece of cling wrap and seal so the cling wrap touches the top surface of the custard, and comes up the inside of the bowl. If you don’t do this, a skin will form on the custard. Place in the refrigerator overnight to allow the temperature to come down, and all the flavors to develop.

Make ice cream (best part!). Oh, and don’t forget to strain. Set your frozen ice cream bowl into your stand mixer or appliance, place all the gizmos in place and turn on. I inverted a mesh strainer on the inside of the bowl as I poured the custard into the mixer. When I got toward the end, I used a slotted spoon to scoop out the lemongrass bits and vanilla bean, then dumped the last couple tablespoons in the mixer (because that last part had tons of vanilla bean seeds I didn’t want clinging to the bowl). You can also strain the custard into another bowl, then dump the whole thing in the mixer. Mix for 15-20 minutes, or until you see you have nice thick, fluffy ice cream churning in the bowl.

I had actually made a lime curd I was going to swirl in at the end (again, trying to use up aging ingredients from the fridge), but it was so tangy I thought I’d save the lime curd for something else. This ice cream has a delicate flavor and would be served best by itself.

Posted on

Key Lime Pie

Key Lime Pie

In my mind, The Birchwood Café’s key lime pie is the gold standard. The lime doesn’t cower away, it stands out boldly between the other two major forces at work: sweet and creamy. As your fork cruises through the chilled custard it stops, then goes “thunk” through the graham cracker crust.

So when I spied a bag of key limes (which aren’t always readily available, just so you know) I did my best to replicate perfection. I think I came close, although the topping is just whipped heavy cream. I suspect Birchwood adds some butter to theirs.

To make this with key limes, you will need an entire 1 pound bag of key limes (about 20 limes). If you can’t get your hands on key limes, you’ll need about 3 regular. This recipe is best if made a day ahead of time (though we aren’t judging you if it ain’t!)

Key Lime Pie Ingredients

Key Lime Pie

Graham Cracker Crust
1-1/4 cups graham cracker crumbs
2 tablespoons granulated white sugar
6 tablespoons good butter, melted
Filling
3 large egg yolks, room temperature
One 14 – ounce can sweetened condensed milk
1/2 cup key lime juice
2 teaspoons grated lime zest
Topping
1 cup cold heavy whipping cream
4 tablespoons sugar

Make the crust. Preheat the oven to 350° F and place the oven rack in the center of the oven. Butter a 9-inch pie or tart pan. Mix together the graham cracker crumbs, sugar, and melted butter. Turn into the prepared pie pan; press the crust down in the middle and work your way up the sides, going all the way around the pie dish. Bake for about 7 minutes or until set. Remove from oven and place on wire rack to cool. If the crust shrunk, gently press it back into place using a wooden spoon.

Make the filling. In the bowl of your electric mixer, with the whisk attachment, beat the egg yolks until pale and fluffy, about 2-3 minutes. Gradually add the condensed milk and beat until light and fluffy, about 3-5 minutes. Scrape down the sides of the bowl and then beat in the lime juice and zest.

Bake the pie until the filling is just set. Pour the filling over the crust and bake for about 10 – 15 minutes, or until the filling is set. Do not overbake! Shake the pan gently. If it barely or doesn’t jiggle, it is done. Remove from oven and place on a wire rack to cool. Once it has completely cooled, cover and refrigerate for several hours or overnight.

Make the whipped cream. Once the filling has chilled, in the bowl of your electric mixer, with the whisk attachment (or with a hand mixer), beat the whipping cream and sugar until stiff peaks form. Either pipe (if you wanna be fancy) or place mounds of whipping cream on top of the filling. Can be stored in the refrigerator for a few days.

Makes one 9-inch pie or tart.