Typically I shy away from baking endeavors in the summer because it is too hot. But this year, it is what I would call a perfect summer. 70’s to 80’s, low humidity. The other week I made foccacia and was pleased to discover that my dough actually rose in the amount of time it was supposed to. Usually (making breads in the winter) I have to double the time for the dough to double.
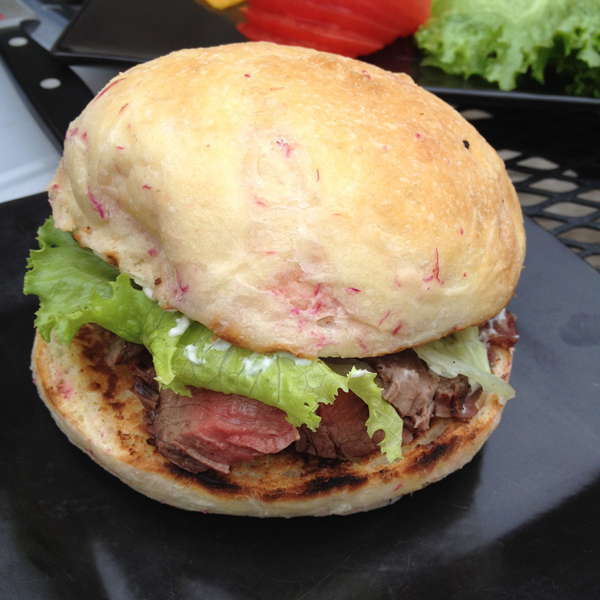
My plan for dinner was to grill some beef tenderloin. Since the weather is so nice, I wanted to make homemade hamburger buns to go with it. I spied some radishes in the fridge from Fava Bean and Radish Bruschetta that I made the other week. (A winner recipe, by the way.)
I hate to admit this, but I am no lover of radishes. In fact, when I signed up for a CSA and got them in my box week after week, I puzzled over who the heck would ever want this volume of radishes. Since then, I am trying to find ways to love the radish, since it is grows in abundance locally. So I stare at the radishes, with beef sandwiches on my mind, and decided what the heck. Maybe they’ll enhance the bun like a horseradish would. I’ll throw them into the dough, see what happens.
Oh mama! Bingo! This is a marvelous sandwich! Squishy (soft, like store-bought) but with enough tang to complement the beef. It’s much more subtle than onion, and doesn’t affect the texture at all.
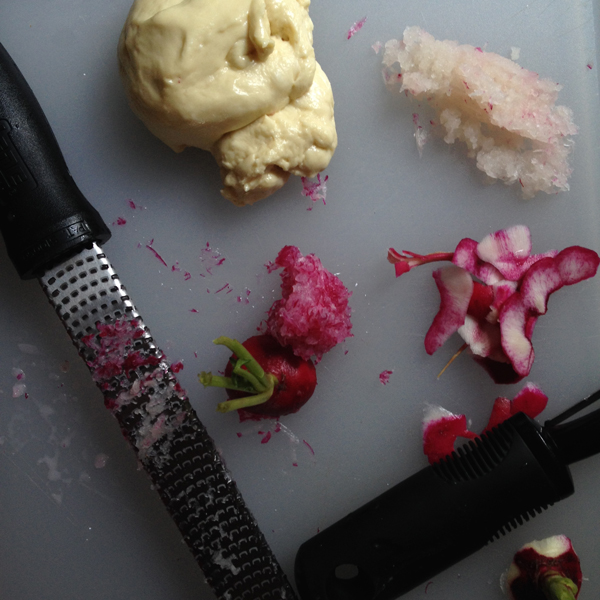
I did experiment with peeled versus unpeeled radishes. Upon grating my first radish I realized that unpeeled would make the dough have pink flecks in it. I guess that just announces you’ve added something unusual. I prefer going incognito and peeling the radishes first, then grating them.
By the way, this is a good recipe for regular hamburger buns if you want to minus the radishes. Just adjust for the moisture (i.e., add more water, like a half cup).
Radish Hamburger Buns
3 cups flour, plus more
1 cup warm water
1 tablespoon instant or dry yeast
2 tablespoons sugar
2 tablespoons butter, melted
1 egg
1-1/2 teaspoons salt
A bunch of radishes (8 to 12)
Activate the yeast. Whisk together the yeast and sugar with warm water. Let it sit until a froth develops on the top (if froth doesn’t develop, your yeast may be too old…better go to the store to get new stuff rather than have dense buns).
Grate the radishes. If you don’t want pink flecks in your buns, peel the radishes. Then, grate them as finely as you can. I used a microplane zester. Keep in mind, here, that radishes vary in size. You may want to start with most of the radishes, leaving some aside. After mixing in the flour, taste the dough after and decide if you want it to radish it up some more. (I started with 8 small-size radishes and definitely wanted more flavor.)
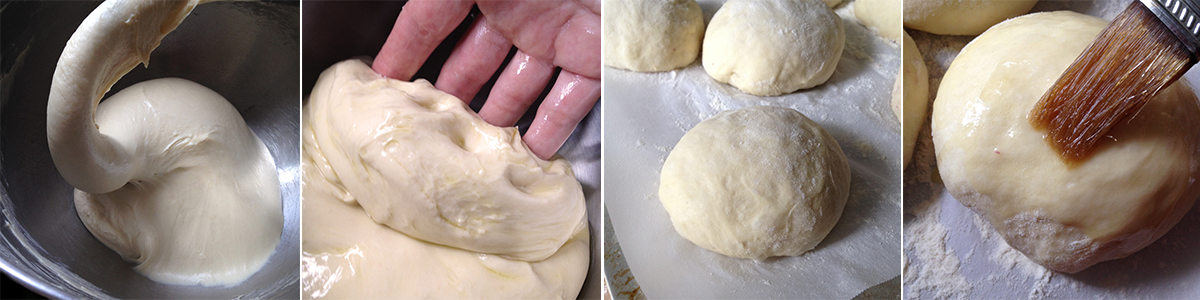
Mix the dough together. If you are using a mixer, you are going to need a heavy-duty stand mixer with the dough hook. I usually start with the paddle, then switch to the dough hook after everything is mixed. Stir together the butter, egg and salt with the yeast and sugar water. Add the grated radishes. On low speed, incorporate the flour a cup at a time. Switch to the dough hook.
Adjust the flour. What you want to do now is get the moisture of the dough right. If it’s too dry, you’ll have dry bread, so we start with excessive water. Just a note, the tackiness of the dough will diminish after it’s mixed for 10 minutes, so don’t overdo the flour. Let it be a little too wet. Start the mixer on medium speed. See the dough sticking to the bottom of the bowl? That’s good. Get a scoop of flour and shake a tablespoon at a time into the mixer. Let it blend in, continue adding a little at a time. You want to adjust the flour so you have about a 4-inch diameter (about a teacup saucer-size) of dough sticking to the bottom while it mixes.
Develop the gluten. Beat the dough for 7-10 minutes. Longer is better. When the dough is done, it should be loose. I like hearing the dough slapping around. Hopefully, there is still some sticking to the bottom of the bowl. If not, you may want to add a little more water and mix it until it is completely incorporated.
Let the dough have a first rise. Form the dough into a ball and place it in a well-oiled bowl. Cover the bowl tightly with plastic and let the dough double. Depending on how much time you have, you can let it rise on the counter or in the fridge. About an hour for room temperature, enough time to go to two stores and get lunch for the fridge.
Deflate, shape and let it rise again. Punch the dough down and separate it into 10 equal(ish) pieces (use a scale if you are a perfectionist). Roll each piece into a ball, getting it as smooth as possible. Lay down a piece of parchment paper on a baking sheet, and place each ball on the sheet with equal spacing. Personally, I like when they smoosh together a little after baking. But, again, if you are a perfectionist and want perfectly separated buns you may want to use two lined baking sheets. Dust the tops lightly with flour and cover loosely with plastic wrap or a tea towel, let rise for an hour.
Rise, butter, bake. When the buns have puffed up some but not quite doubled, preheat the oven to 375°. Melt a couple tablespoons of butter and brush the tops of the dough balls with it. Bake the buns for 12-15 minutes, or until the tops are browned. Cool them on a wire rack completely before cutting in half.